
Setting up a professional exhibition booth does not have to be complicated or time-consuming. If you are preparing for an event at venues like ICC Sydney, Melbourne Convention and Exhibition Centre, or Brisbane Convention and Exhibition Centre, efficiency is everything. This is where 3m Booth Kits stand out. Designed for tool-free assembly, these kits allow you to create a stunning display quickly while keeping your setup process stress-free.
Why Tool-Free Booth Setup Is a Game-Changer
Trade shows often come with tight schedules and strict setup windows. Carrying tools, dealing with complicated instructions, and troubleshooting issues can slow you down.
3m Booth Kits eliminate these challenges entirely. Their tool-free design means you can assemble everything using simple connectors and pre-engineered components. This makes them ideal for businesses that want a reliable, repeatable setup process across multiple events in Australia.
What Comes Inside a 3m Booth Kit
Before you begin, it helps to understand what is included in your kit. Most 3m Booth Kits are designed as complete solutions, providing everything you need for a professional display.
Typically, your kit includes:
- Lightweight aluminium frame sections
- Push-fit connectors and support bars
- Tension fabric graphics
- Carry bags for easy transport
- Optional add-ons such as lighting or monitor mounts
Each component is designed to work seamlessly together, making the entire setup process smooth and intuitive.
Step 1: Unpack and Organise Your Components
Start by unpacking all parts of your booth kit and laying them out clearly on the floor. This step is important because it helps you identify each piece and ensures nothing is missing.
Organising your components before assembly saves time and prevents confusion later. You will immediately notice how lightweight and manageable each part is, which makes handling much easier.
Step 2: Assemble the Aluminium Frame
The frame is the foundation of your booth. Begin by connecting the aluminium poles using the built-in push-fit or snap-lock system.
Each piece is typically labelled or shaped in a way that makes it obvious where it belongs. Simply align the sections and press them together until they click into place. No tools are required, and the structure quickly takes shape within minutes.
Step 3: Secure the Structure for Stability
Once the frame is fully assembled, ensure all connections are secure. Check that each connector is properly locked and that the frame stands evenly.
The lightweight aluminium is designed for both strength and stability, so once assembled correctly, your booth will be sturdy and ready for the next step.
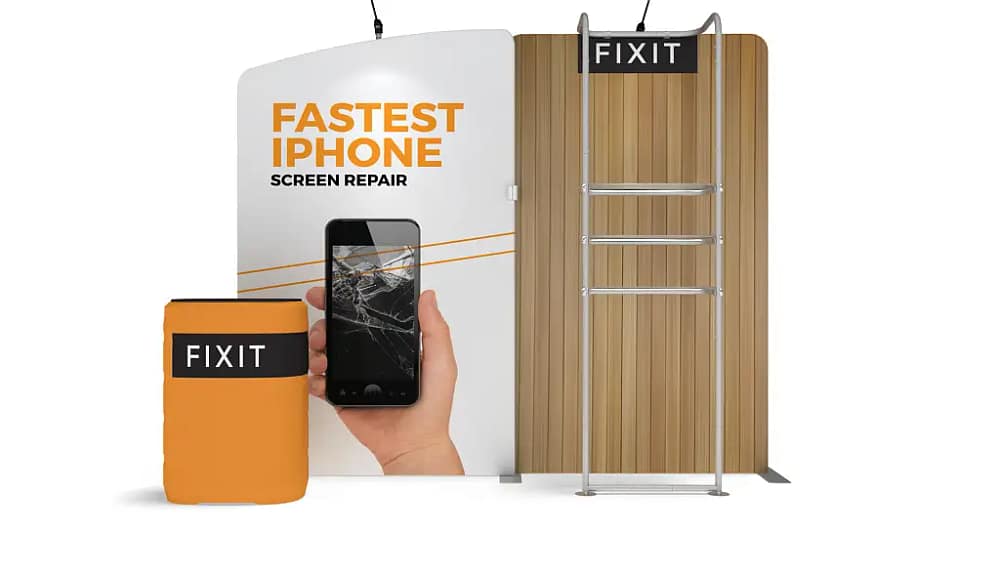
Step 4: Attach the Tension Fabric Graphics
Now comes the part that brings your booth to life. Carefully slide or pull the tension fabric graphics over the frame.
These graphics are custom-printed and designed to fit perfectly. As you position the fabric, make sure it is aligned properly. Once in place, smooth out any wrinkles to achieve a clean and professional finish that stands out on the exhibition floor.
Step 5: Add Optional Accessories
Depending on your setup, you can now install optional accessories such as LED lighting, shelves, or monitor stands.
These additions can enhance your booth’s functionality and visual appeal. The modular nature of 3m Booth Kits allows you to customise your setup based on your specific marketing goals.
Step 6: Final Adjustments and Presentation Check
Before your event begins, take a few moments to inspect your booth. Check that all elements are aligned, graphics are smooth, and the structure is stable.
This final step ensures that your booth looks polished and ready to attract visitors. A well-presented display can make a strong first impression and help draw attention to your brand.
Built for Portability and Reuse Across Australia
One of the biggest advantages of 3m Booth Kits is how easy they are to transport and reuse. After your event, the entire booth can be disassembled just as quickly and packed into compact carry bags.
This makes it ideal for businesses attending multiple exhibitions across Australia. You can move from one venue to another without worrying about complex logistics or heavy equipment.
Conclusion
Setting up your exhibition booth should be simple, fast, and effective. With 3m Booth Kits, you get a tool-free system that delivers professional results every time.
By following this step-by-step guide, you can confidently assemble your booth, create a strong visual presence, and focus on what truly matters, connecting with your audience and making your exhibition a success.


