
If you are preparing for a trade show or exhibition in Australia, you already know how important it is to create a strong visual presence. A well-designed display can attract attention, communicate your brand message clearly, and leave a lasting impression. That is where Non-Backlit Banners (6m) come in. These large-format displays are not only eye-catching but also incredibly practical.
What Are Non-Backlit Banners (6m)?
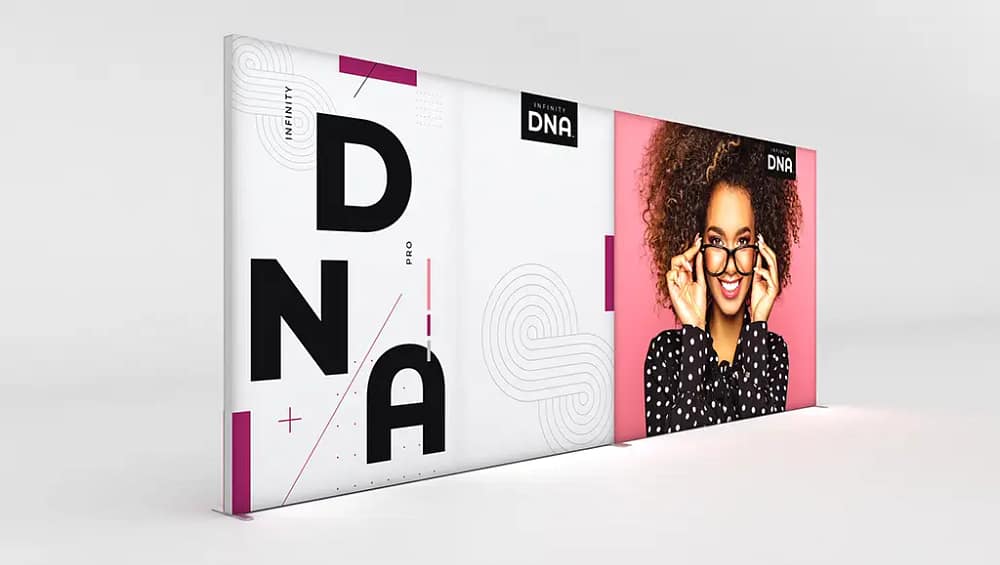
Non-Backlit Banners (6m) are wide-format fabric display systems designed for exhibitions, trade shows, and promotional events. They feature a lightweight frame paired with high-quality printed graphics that stretch smoothly across the structure.
Unlike illuminated displays, these banners rely on ambient lighting, making them more cost-effective while still delivering strong visual impact. Their large 6m width makes them ideal for creating a bold backdrop or defining your booth space.
Why Choose Non-Backlit Banners (6m) for Australian Events?
Choosing the right display solution can make a huge difference in your event success. Here is why these banners are a popular choice across Australia:
- Lightweight and portable for easy transport between cities
- Tool-free assembly that saves time during setup
- Durable materials designed for repeated use
- Cost-effective compared to custom-built stands
- Professional appearance suitable for all industries
For exhibitors who travel frequently or attend multiple events throughout the year, this solution offers both convenience and value.
Components Included in the Banner Kit
Before you start assembling, it is important to understand what comes with your Non-Backlit Banners (6m) kit. Typically, you will find:
- Aluminium frame sections
- Connector pieces for secure assembly
- Tension fabric graphic print
- Support feet or base stabilisers
- Carry bag for transport
Each component is designed to fit together seamlessly, making the setup process straightforward even for first-time users.
Step-by-Step Assembly Guide
Step 1: Lay Out All Components
Start by unpacking all parts from the carry bag and placing them on a clean, flat surface. This helps you identify each piece and ensures nothing is missing before you begin.
Step 2: Assemble the Frame Structure
Connect the aluminium frame sections by following the numbered or labelled system. Most frames use a push-fit or click-lock mechanism, allowing you to build the structure quickly without tools.
Make sure all joints are securely connected to create a stable base.
Step 3: Attach the Support Feet
Once the frame is upright, attach the support feet at the bottom. These provide stability and ensure your banner remains steady throughout the event.
This step is especially important for busy exhibition halls where foot traffic is high.
Step 4: Install the Fabric Graphic
Carefully take the printed fabric and align it with the frame. Slide or stretch the graphic over the structure, depending on the design.
The tension fabric will naturally smooth out wrinkles, giving you a clean and professional finish.
Step 5: Adjust and Finalise the Display
Once the graphic is in place, check for alignment and make minor adjustments if needed. Ensure the banner is straight, taut, and properly positioned within your booth.
Your display is now ready to impress.
Tips for Faster Setup at Trade Shows
To make your setup even more efficient, keep these tips in mind:
- Practice assembling your banner before the event
- Label your components for quicker identification
- Work with a team member to speed up installation
- Store graphics properly to avoid creases
These small steps can make a big difference, especially when working within tight event schedules.
Where Non-Backlit Banners (6m) Work Best
These banners are incredibly versatile and can be used in a variety of event settings:
- Exhibition booth backdrops
- Conference stages
- Product launch displays
- Retail promotions
- Corporate events
Their large size makes them perfect for creating a strong visual anchor that draws attendees into your space.
Conclusion
Non-Backlit Banners (6m) offer the perfect combination of simplicity, portability, and professional presentation. With an easy step-by-step assembly process, even first-time exhibitors can set up a stunning display without stress.


